Introduction
The Data Importer lets you raise Intercompany Transactions using an import template. This is useful if several companies raise multiple intercompany transactions against each other regularly as Intercompany Transaction templates can be saved, reused, and copied.
Before you begin, all the relevant IC and control accounts must be set up correctly. For more, see Using the New Intercompany Module.
Info: User Permissions
To use the data importer, your user profile must have the Data Importer permission. For more on user permissions, see Setting Up System Users. User role determines the range of available imports. Admin users have access to the full suite, while Users only have access to a subset.
Example
A holding company and an insurance company want to create Intercompany Transactions. The holding company receives a multiline purchase invoice from the insurance company on behalf of the group. The insurance company wants to recharge the purchase invoice to all the subsidiary companies.
Setting up the holding company only as a Consolidation Entity would only allow it to have General Ledger functionality, without Sales, and Purchases. Therefore, the holding company would not be able to raise Intercompany Transactions. To allow for Intercompany Transactions, the holding company needs to be set up as a non-trading company as well as a Consolidation Entity. The holding non-trading company will then form part of the consolidation process along with all the subsidiaries.
IC Transactions Templates
The Intercompany Transactions template facilitates:
-
Intercompany recharges: When uploaded, this template will create Sales Transactions in the sending company’s IC Accounts and matching Purchase Transactions in the receiving company's IC Accounts.
Note
Before continuing you must understand the standard method of raising once-off intercompany charges.
- Invoice auto-generation: The Purchase Ledger Account will populate with the details of the incoming Invoice.
See:


Downloading the Template
- Go to Setup > Data Importer.

- Under Start, click on Transactions Importer.
- Click Download Intercompany Transactions Template File.

- Open the newly generated Excel file. Check Enable Editing and Enable Content. The template contains the following worksheets:
- Intercompany Purchase Invoices
- Intercompany Charge Journals
- Intercompany Recharges
- Fill in the required fields referring to the relevant sections below.
- Save as a macro-enabled file.
Intercompany Purchase Invoices Importer
This is not mandatory.
Select the relevant data from the dropdowns.

Intercompany Recharges Importer
This is mandatory.
 Transaction types and associated data
Sales and Purchase transactions are posted with different data. If you leave any blank, the system posts the same as those recorded against the Sales Transactions.
- Sales Transactions: Posted with the General Ledger Code, Tax Code, and Project Code (BI Code) (highlighted in yellow).
- Purchase Transactions: Posted with the Destination General Ledger Code, Destination Tax Code, and Destination Project Code (highlighted in green).
Intercompany Charge Journals Importer
Recovering Costs
To recover costs that may not have a Purchase Invoice as their source, or to collect them in Head Office for month-end distribution, the process is as described previously:
- Post a Journal or series of Journals to the Head Office General Ledger. Use Head Office Sales Transactions to the subsidiaries.
- Recover some or all the costs from the subsidiaries. Use corresponding Purchase Transactions from Head Office (or other company) in each subsidiary.
The Intercompany Charge Journals and Intercompany Purchase Invoices templates are optional. Instead, you can process Head Office Purchases (and Payments) throughout the period:
- Use the Purchase Ledger.
- Distribute these costs using month end Intercompany Journals from the appropriate Purchase General Ledger Accounts to the subsidiaries.
Example of Intercompany Transactions
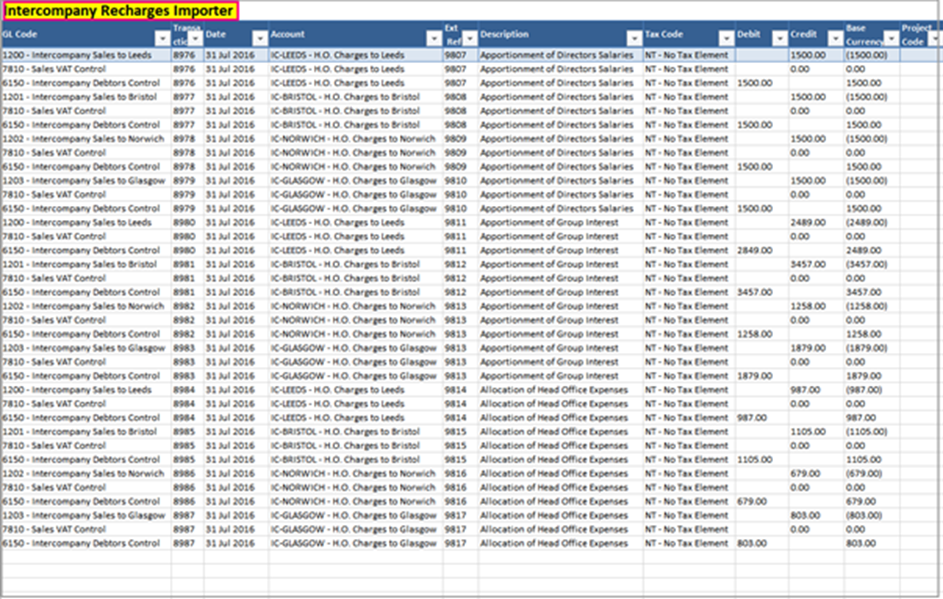
In the following example, we have:
- posted a single Journal to Head Office in respect of Directors Salaries, allocating £6,000 to the subsidiaries.

- Recharged other Purchase Ledger Costs which accumulated throughout the period.

Using Excel Formulas in the Template
Example
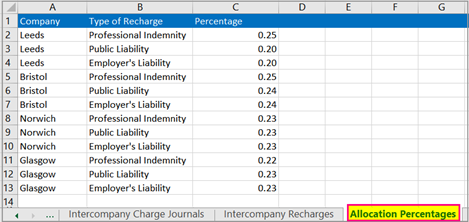
This example is based on the Insurance Recharges Template. Another worksheet titled "Allocation Percentages" was added containing the Head Office Insurance Purchase Invoice.

This example shows the application of these percentages in the Intercompany Recharges Sheet:

Note: Creating a Template
The process of generating the Data File overwrites the formulas rendering the template unusable next time. Instead, save a copy of the Master Template for reuse, update any required fields, and use this copy to create the required Intercompany Transactions while leaving the Master Template complete with the formulas untouched.
Import the Template
Step One: Generate the Data File
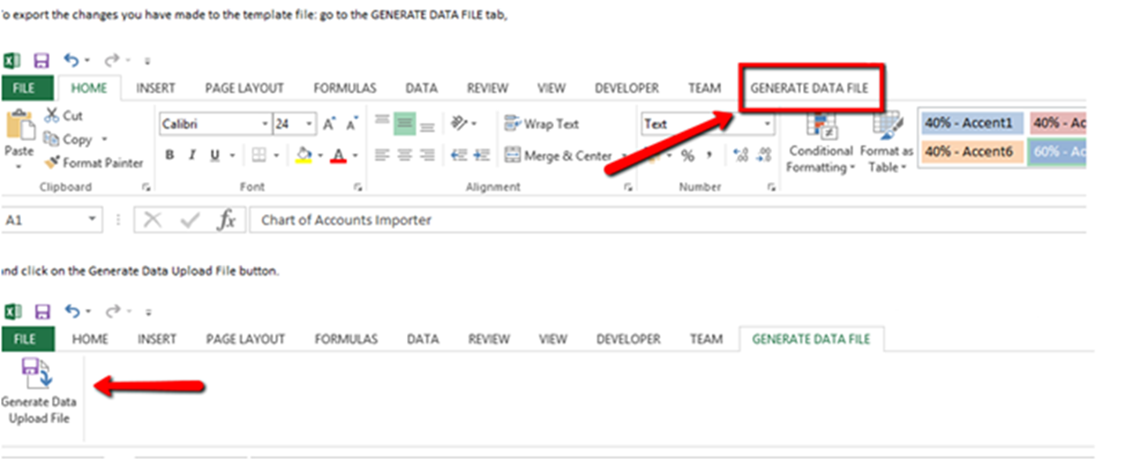
When you have completed all worksheets correctly, go to the Generate Data File tab and click Generate Data Upload File to generate the CSV file.
This is the first stage of error validation. If there are errors, correct them and click Generate Data Upload File again.
You will find the CSV file in the same location as the macro-enabled Excel file. This file will be used to import all the data you added. During upload the system will check for format and that the CSV file is in the same location as the XLS file. You will receive confirmation if this is the case.

Step Two: Import the Data File
- Log into the sending company (Head Office).
- Go to Setup > Data Importer > Transactions Import > Intercompany Transactions.
- Click Browse to find your saved CSV template.

- Click Upload Data. If everything is setup correctly you will receive a confirmation message. If there are any errors, correct them in the Excel file, generate another csv file and upload it.
Step Three: Transactions Import
- Select Reconciled. Unreconciled is only relevant to the importation of Bank Transactions and does not apply to Intercompany charges. Click Apply.

- The screen will display any errors. Correct any errors in the original template, generate another CSV file, and then upload it. If the import is successful, you can click Next.
Step Four: Clean Up
- Go to Transactions Import > Clean Up.
- Click Clean Up. You will receive a confirmation message when the process is complete.


